Cooking over a fire pit is always fun, and the taste of food cooked in an open fire has no match. This food also brings you back to old-school campfire days. Starting to crave that roasted smell and appetizing grills already? You can enjoy a homely-campfire meal instantly. All you need is a grill grate. And if you don’t have any, no problem, you can make it now.
This article will get to know Four different ways to DIY a grill grate for your fire pit. From scratch to restoring an old one. All simple, easy and budget-friendly DIY ways to make a grill grate in one place.
So without further delay, let’s start exploring the DIY methods. Before that, let’s have a glance at the exciting advantages of a fire pit grill grate.
Advantages of Having A Grill Grate
- The very first advantage of having a grill grate is you can have super tasty food.
- You can cook over an organized fire pit.
- Grill grates retain your fire pit from getting messy from cooking.
- A fire pit grill grate means bbq, roasted chicken and beef, sizzling sausages and hotdogs every day.
- Allows you anytime outdoor celebration.
- Ease the complication of making food over an open fire pit. For example, cooking food while camping.
- Having the option of cooking food on a grill grate over a fire pit always makes your patio times more enjoyable with family and friends
You may also like: The Best Fireplace Grates
Method:1 DIY Custom Grill Grate
This DIY is something you can call “making out of scratch.” All you need is an old and non-performing grate from your old griller. The tools you will need:
- Old grill grate
- Metal bar/ Roll Rod
- Rebar
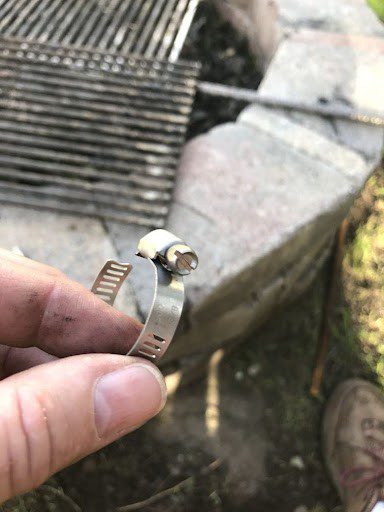
- Hose Clamps
- Welding machine
- Crisco
 |
 |
 |
 |
Steps to follow:
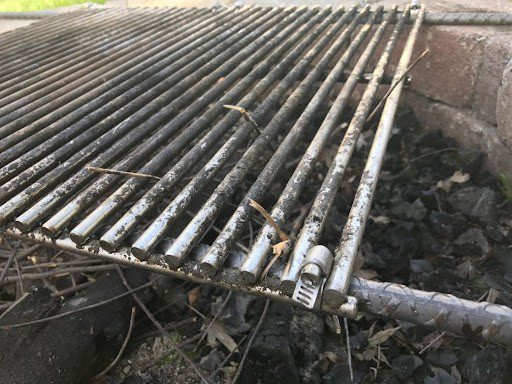
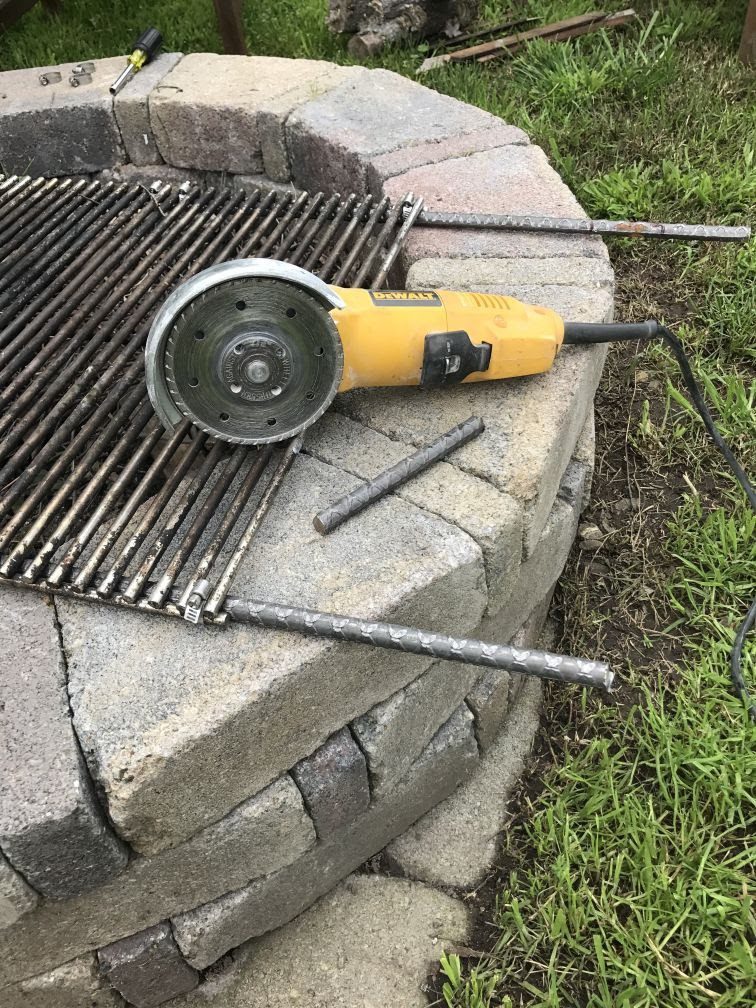
- First, take out the old grill grate and clean it properly. Remove the damaged and rusted parts.
- On the structure, add metal bars where needed. Weld them all together.
- Attach the rebar on two sides as it stands properly on your fire pit and works well as a handle.
- Cut off extra parts of the rebars. The size will be according to your fire pit. Smoothen up the ends.
- Now join the rebar and grate part with hose clamps, or you can weld them for a better fit.
- Season the whole structure with Crisco. This layer will prevent your food from sticking to the grate. Also, it will protect the grate from rust.
Your fire pit grate is on for cooking something sizzling and delicious. You can use this grate on an open fire and especially on a ground fire pit.
Method:2 DIY Adjustable Grill Grate
An adjustable grill grate comes with an extensive usage option. This grate is usually compact. You can open it into parts and take it anywhere you want. However, let’s unfold the DIY method of making a grill grate for a fire pit step by step. Before jumping on the steps, take note of what materials you are going to need.
- A solid mesh screen
- Heavy-duty metal tube/bar, pipe
- Angle iron
- Welding Magnet
- Rebar
- Bolt screw
- Welding machine
- Band saw
Steps to follow:
- Take a solid mesh screen of your preferences. But don’t go too big. The size should be medium and compact.
- Measure the angle iron according to the mesh screen size and bend it to a frame.
- Place the mesh screen into the angle iron frame and check if it fits properly.
- Using the welding magnet, secure the corner of the iron frame. And weld the corners.
- After welding the frame, attach the mesh screen and again weld properly.
- Take a solid iron pipe and cut out a 2-inch collar from it. Make a hole on it to put a screw. This screw will adjust the standing pipe and mesh screen.
- Attach the collar with the mesh screen.
- For easy grip, weld a small iron bar on the screw to make a wing nut.
- Now take a metal pipe/tube or bar. This one should be smaller in radius than the collar piece.
- Cut the pipe bar according to your choice. And join the L-shape support rebar on the end of this pipe. Cut their end to make a spike.
Your adjustable grill grate is ready to rock! Attach the grate with the spike bar. Place it over your fire and enjoy your grilled food. After finishing displacement apart, move, port or store shortly.
Method:3 DIY A No-Welding Grill Grate
This DIY process of making a grill grate is the way with minimum effort and the shortest supplies. On this, you can carve a grill grate for your griller as well as a fire pit. Let’s have a quick look over the materials:
- Mesh screen
- Scale
- Snip of lumber with thin cut out on the middle
- Rebar
- Angle grinder with cutting disc.
Steps to follow:
- Take the mesh screen and measure as per your fire pit or griller size.
- Mark out the extra part and cut it out with an angle grinder and cutter.
- Bend it and remove the extra parts.
- Now take two rebars and cut them the same as the top length of your fire pit (For grillers, you can avoid this step).
- Now mark the 2-inch on the side edge of the mesh screen.
- Place the mesh screen on the cut of the lumber and bend it on both marked sides. You can do this step also with pliers.
- You can now place the mesh screen over the rebar with the bent side for the fire pit. And your grill grate is ready.
- On the other hand, you can fit the bent side for a griller and cut short edges to create a holding stand. Repeat this process with one or two mesh screens until your griller is fully covered.
This process is best suited for beginners and quick arrangement. No welding, no heavy or extra-ordinary tools are needed.
Method:4 Restoring Old Grill Grate Onto New
On this DIY, you can renew your old grill grate in a brand new condition. This process is dedicated to the griller. Necessary tools for this method:
- Roll rods
- Angle Iron
- Scale
- Measurement tape
- Welding machine
- Welding magnet
- Band saw
- Crisco
Step to follow:
- Remove your old grate and clean the griller.
- Take the proper measurement of the griller’s grate portion.
- Scale up the angle iron and cut the measured corner in a triangular shape.
- Now bend it on each cut corner and create a rectangular. And check the fit by placing it on the griller. If the measurements are right, then weld them well.
- Now take the roll rods and cut the first one-piece down. Place it on the angular frame and check the fit.
- Now cut down more roll rods according to the perfect size. And weld the very first one in the middle.
- After that, keeping the same gap, weld the rest of the rods one by one.
- Brush the grate with Crisco to keep it rustproof and non-sticky.
After the Crisco dries off, restore the grate onto the griller. Your griller is ready to perform. Call your friend and arrange a feast.
Method:5 The Ultimate Solution
After going through these ideas, if you find yourself less energetic and lack confidence, don’t get disheartened. We have the ultimate solution for you. If nothing works out, you buy a grill grate for your fire pit. Check out the best-reviewed grill grate for your fire pit, which is well-performing, high quality, and, last but not the least, affordable.
Frequently Asked Questions
1. Is it okay to grill on rusty grates?
No, it’s completely not okay to grill on rusty grates. Doing this could spoil your food. Sticking into your food can enter your body, and that will cause discomfort in your digestion. It can even cause harm to your intestinal tract.
2. Should you oil the grill before cooking?
It would be best if you oil your grate before cooking. It will season your grate and make it completely ready to cook food on it. Also, oiling your grate will prevent sticking food with the grate. Moreover, it will enhance the tenderness of food.
3. What can I use for a grill grate?
You can use any edible oil. For example, sunflower oil, vegetable oil, canola or peanut oil, and avocado oil. Canola and peanut are best because they are high in smoke points, which is around 450 degrees. Remember this tip of preheating your grill grate every time before cooking on it for the best result.
4. What kind of metal can I use to make a grill grate?
You can use aluminum, galvanized steel, stainless steel and others. These options are perfect and have no possible health risk. However, among them, stainless steel is the best.
5. Is it okay to put aluminum foil on the grill grate?
Yes, it is okay to put aluminum foil on the grill grate. Aluminum foil will work as a pot for your food, keep them well arranged, and grate less messy. Also, it will help to conduct the heat more evenly, which will enhance the cookness of your foods.
Use instruction: Preheat your grill grate, and put the non-sticky side of the foil paper over the grate.
Conclusion
DIY refers to “Do It Yourself.” And this process of making anything gives you self contentment and a great escape to your creativity. We hope this write-up on the DIY grill grate will be favorable for you. Have fun with this self-project and cook delicacy on your own fire pit grill grate. Happy firing!